teach2you

teaching with technology


Leave a comment

MakerBit MicroBit Smart Car

At the start of the school year we had big plans for our Makerspace after school activity. The course was full within two minutes, two weeks later we started introducing our students to the wonderful world of making! We started by introducing them to Tinkercad, 3D Printers and 3D pens! Then we ordered a MakerBit R set to get them started with coding and making a Smart Car. But the 2019/20 school year turned out to be full of strange events that disrupted school. First we had the Hong Kong protests, then in January of 2020 came COVID19. This all but canceled our CCA Makerspace. So the only answer for the student was either DIY or watch tutorial videos.

Hence this blog is about those videos and instructions to get you started building a Smart Car.

D8A2681C-8E40-4D64-B5D2-300B1E45DDD0

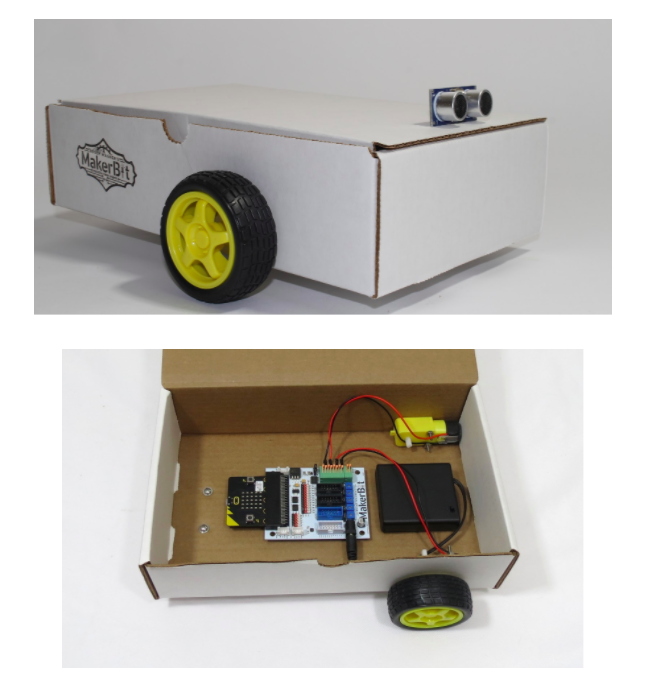
So here is Part 1, building the car from the kit and adding the MakerBit/MicroBit.

Part two will be coming soon and will include wiring and the basics of coding, feel free to contact me with any questions or share your making experience! Roger Wagner has put together instructions for making a SmartCar with the MakerBIT from a cardboard box, these instructions can easily be adapted for use with our 2 wheel or 4 wheel smart car kit.Screenshot 2020-07-11 at 1.53.43 PM 

 Part 2 adding ultrasonic sensors and cables with coding.

After a some what long break I got the smart car working using the ultrasonic sensor after Roger Wagner edited the code by giving it a 100ms delay, which I then changed the Call Forward command to reverse as I am guessing I wired the motors incorrectly!

The following video shows the steps to wire the ultrasonic sensor to the MakerBit using a Grove I/O connector.

https://youtu.be/GeX0Jnm1alQ


Leave a comment

Google Meet Virtual Backgrounds using iMovie and Snap Cam

After my PYPx students came to ask about using Green Screen to help them with their Unit of Inquiry (UOI) I decided to look at Snap Cam and iMovie. First I made a video using the Snap Cam app on the MacBook.

Next I imported the video to iMovie and started a new project. This allows you to add titles and overlays, making the student presentation more interesting.

Screenshot 2020-06-13 at 7.17.03 PM

In this example I added titles and some sound effects, it seemed that the original audio file was missing when I imported the clip from Snap Cam, looks like more testing is needed! Here is the test example;

If you are interested to try Snap Cam check my previous post or follow the LA Edtech Youtube channel.


7 Comments

Virtual Backgrounds for Google Meet

We are now seeing more and more functionality added to Google Meet that is making it a better choice than Zoom! One feature that is missing is an easy way to create virtual backgrounds, but thanks to Eric Chiu from GEG HK-Macao I just heard about Snap Camera  an application you can download for Windows or Mac.

Screen Shot 2020-04-17 at 7.27.21 PM

Snap Camera allows you to select or make different Lenses to change your background or change your appearance!

Screen Shot 2020-04-17 at 7.08.04 PM

This application will add lots of fun to your online lessons and you will really get the attention of your students! Update! What is even better you can create your own backgrounds at Lens Studio

Once you have downloaded Snap Camera you will then need to click the 3 dots at the bottom right of your Google Meet window and select the Snap Camera from the list.

Screen Shot 2020-04-19 at 8.43.25 AM

See the install process by watching the following Youtube clip;


Screen Shot 2020-04-17 at 7.31.20 PM


Leave a comment

Google Meet Updates

Google recently introduced some great new features to Google Meet:

Using Google Meet inside Classroom, Grid View and the Nickname function

Educators can now create a unique Meet link for each class, which is displayed on the Classroom Stream and Classwork pages. The link acts as a dedicated meeting space for each class, making it easy for both teachers and students to join.

The Meet links created by the Classroom integration are nicknamed meetings. For education users, participants can’t rejoin nicknamed meetings once the final participant has left, unless they have meeting creation privileges to start a new meeting. This means if the instructor is the last person to leave a nicknamed meeting, students can’t join again until an instructor restarts the nicknamed meeting.

Grid View

Grid View allows you to see everyone in a grid via the settings in the top right hand side of the Meet.

Screen Shot 2020-04-17 at 7.07.52 PM

Nickname function for Meets can stop students starting a Meet or staying in the Meet after you have left, unless they have meeting creation privileges to start a new meeting.

To use the feature just start your Meet at https://meet.google.com/ using a Nickname for your class which can be reused each time. But you can not generate a link as with Google Calendar.

Here is a video that explains the steps;

You can visit Google for Education for more information;
https://www.blog.google/outreach-initiatives/education/meet-for-edu

Google Chrome extensions for Google Meet

There are also some great Google Chrome extensions for Google Meet which can add functions like attendance, Raise hand and Thumbs Up emojis!

Screen Shot 2020-04-13 at 12.20.25 PM

You can find the extensions here!


Leave a comment

3D Pens and Printers, the Making of a MakerSpace!

3D printing technology has been around for a while, but the learning and fun that can be applied to this amazing technology are endless. One of our major goals for 2019 was to expand the activities of our tech lab to become more of a MakerSpace. Earlier in the year a very good friend Barry Lawrensen was leaving Hong Kong and donated 70 3D pens, plus PLA refills. We had no idea how to use them in our lessons so we just starting teaching the students how to operate them and let the creativity begin! Once MacBook had dominated the lunch time recess, but it was morphing into the makings of a MakerSpace!

Starting with just one student, the use of 3D pens grew and before long students where lining up to get their hands on them and teachers were booking out the class sets!

IMG_7718

IMG_7734

All this time we wanted to get a 3D printer for our tech lab. Remembering that the were some unused 3D printers in our Design Technology department I asked Ms Mia if I could use one and she happily said yes! But it did not work, I tried fixing it but the printing head feel off, so I asked around for help and those that knew about them where flat out teaching. So then I looked for repairers of the Robox Printers, which by then I had four in the tech lab (non where working!). After using a trusty Google search I came across a business called STEAMaker Ltd. This is how I meet the very knowledgeable William Ha, he took all the printers to his workshop and started pulling them apart to assess the repair costs. At the same time I was being told to ditch them and buy new printers. Yet I decided to push ahead as these printers seemed perfect for use with our primary students and to replace a similar printer was going to cost upwards of $8000 HK. The repair quote came back and it was just over $4000 to fix all four 3D printers!

Three weeks later the printers came back and within no time students and teachers had got the 3D printing bug! Everyone was mesmorized watching the printers in action! We started finding objects on Thingiverse with all four printers going flat out throughout the day.

This is just the beginning of our journey with 3D printing and developing a MakerSpace! Stay tuned for more adventures in 2020!


Leave a comment

Fun with Ardunio

The maker movement and STEM have grown in popularity over the years and are now becoming a big part of the curriculum with most schools. As a teacher, it can be tricky to keep up with the changes! I have found Edx courses a great way to learn new things!

I just started a course on “Arduino Programming, from novice to ninja“, in which you learn to program using basic electronics and Arduino, and see that anyone can become a maker!

Arduino is an open-source computer hardware and software company, project, and user community that designs and manufactures single-board microcontrollers and microcontroller kits for building digital devices and interactive objects that can sense and control objects in the physical and digital world (Wikipedia). Although the programming was a bit tricky, it was fun making the projects! And the Arduino kit is inexpensive, which you can get from Banggood.com which includes cool things like LED lights, motors etc.

Image result for arduino beginners kit

The great thing about using Arduino is the range of disciplines you can learn, from coding to maths and even literacy! And for those students who don’t get into the books, this could be the hook to learning you have been looking for! Here is an example of the coding to make a light blink;

/*
Blink
Light the LED for 1 second,
then turn it off for 1 second.
*/

// Number of the pin connected to the LED:
int led = 13;

// the function runs once when you press reset or power the board
void setup() {
// initialize digital pin ‘led’ as an output.
pinMode(led, OUTPUT);
}

// this code runs over and over again as long as there is power
void loop() {
digitalWrite(led, HIGH); // light LED (send 5V to the pin)
delay(1000); // wait 1000ms = 1s
digitalWrite(led, LOW); // turn off LED (0V to the pin)
delay(1000); // wait another second
}

IMG_0513

Looking for some learning this summer? Arduino could be a fun experience that you can take back to school next term! Find out more about Arduino by visiting the Arduino website.


Leave a comment

Apple Screen Casting

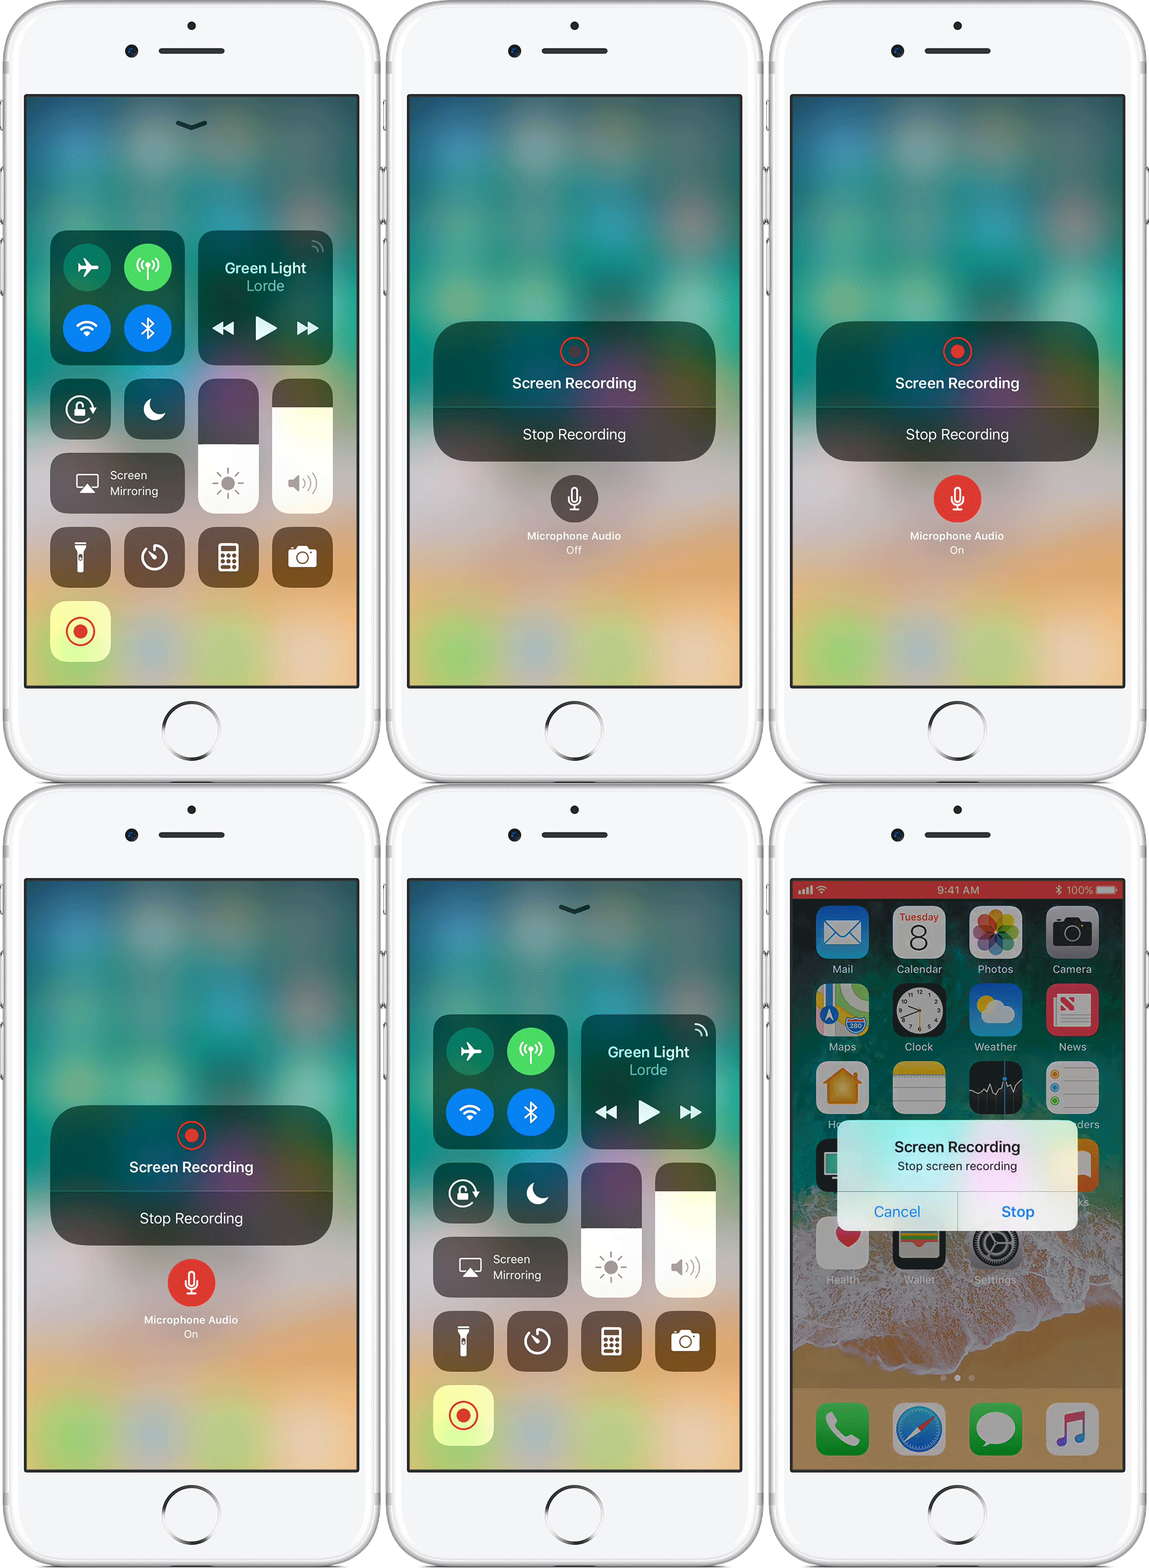
One of the best ways to help students understand how to use applications is screencasts, as they can watch it over and over again! Now with the release of  IOS 11.3 it is even easier to make screencasts for iPhones and iPads!

Record your screen

  1. Add Screen Recording to Control Center. Go to Settings > Control Center > Customize Controls, then tap  next to Screen Recording.
  2. Open Control Center.
  3. To capture sound while you record, press deeply on  and tap Microphone Audio.
  4. Tap , then wait for the three-second countdown.
  5. To stop recording, open Control Center and tap . Or tap the red status bar at the top of your screen and tap Stop.

You can find your screen recording in the Photos app.


https://support.apple.com/en-hk/HT207935


3 Comments

Google for Education Certification

I first started using Google apps back in 2005 when I switched from telstra.com webmail to Gmail. Once I started teaching ICT at primary school in Hong Kong I was hooked on Google, I attended an educational technology (edtech) workshop with David Warlick and this was the birth of my passion for all things related to edtech.

Over the years I promoted Google apps in my school to both students and teachers, as time progressed more and more people started adopting these amazing tools. I then joined various Google Education summits in Hong Kong and meant to get certification some years ago, but procrastinating got the better of me! But better late than never they say! Finally, I completed the Google Educator Level 1 Certification!


Leave a comment

CHIP

I just received my first post launch Kick Starter product, a $9 computer called CHIP! And what a great way to start learning about computers, both hardware and software. CHIP uses a Linux operating system (OS) and is super easy to use! You just need the following bits (peripherals) to get it running!

Keyboard

Mouse

Powered USB port

TV or monitor

And then you are good to go!

Here is what you get out of the box!


Do you want one? Visit https://getchip.com/pages/chip I will update more info soon!


Leave a comment

EdTech Then and Now

 EdTech Then and Now

 Assignment 1.1: EdTech Then and Now


Introduction

I have loved using technology since childhood and when I became a teacher in my mid-forties I was very fortunate to teach Information Technology and Communications  (ICT),  my prior experience had been with personal electronics like mobile phones and computers and supporting the telstra.com website, but not so much education technology. Now we see that these technologies have entered into the mainstream of  education.  I was also given Biblical studies as a teaching subject and so now I am thinking of ways that I can use technology to enhance student learning in this subject.

 Part 1: Current Technology

The current technologies that I am using in teaching Biblical studies and ICT includes; Edmodo,  kahoot , and Google Apps for Education which includes  Google Slides, Google sites, Google Docs, Google Sheets, Aurasma (Augmented Reality) and iPads along with more traditional technologies like workbooks and textbooks.

During class, I use Googles Slides to display the lesson on a Smart Board which gives some limited options for students to interact with the lesson. I also post the Google Slide on Edmodo so the students can revise or watch some of the content later. Edmodo is a collaborative platform that allows teacher and students to post and comment on information or ‘Flip the classroom’. Google Slides also have the function to embed YouTube clips directly into the slide which makes for more interesting content for the students and also is more convenient for the teacher when presenting the lesson. Google Apps have the added advantage of being able to share the files and collaborate in its production, which can provide many great learning opportunities like group work and peer review.

 Some of the technologies goals

The goals of using these technologies are to provide the students with a multi-modal form of learning that give all students the opportunity to learn at their own pace and learning style. With the hope of producing authentic learning so the students produce work that matters to them by adding a student voice. The main goals being;

  1. To provide a learning environment in which no one is left behind
  2. To make learning authentic

What does the user “do” when she/he uses the technology?

Students can learn by working on the activities assigned by me using the subject workbook. This is where things get interesting, not only do they complete the worksheet, but they get to inject their own voice or ideas onto that worksheet.

Using Augmented Reality (AR) with the Aurasma App the students can create an authentic experience via the IPad and share this with the class.  This could be any multimedia presentation like a video or audio file or they could produce a site, document, book, slide or even handmade objects like art or handwritten works, which could be digitally converted and overlayed onto the workbook (3D printing also opens some amazing options). They can also collaborate using the Edmodo platform. Here they can also view all my Google Slides and learn more about the lesson (nobody gets left behind).

 Does the technology direct the learner toward a specific goal or is it more open-ended?

Using this combination of educational apps the student is directed by the question, but the answer then becomes open-ended which can either be assessed using a rubric or can totally peer review or self-assessed.

How does it seek to engage and/or motivate the learner?

Using this technology engages the student as they are providing their own creative ideas and views on the topic, which engages intrinsic motivation. This tends to lessen the need for external motivation and it the long run produces better results. In his book ‘Drive’ Daniel Pink concludes that Carrot and Stick motivation kills creativity. Hence by providing the student with choice and open-ended activities, this will produce more creative results.

How might the learner learn from it?

The learner is provided with many modes of learning and hence can choose how they wish to learn. Using the power of peer group learning, they can collaborate on the project and learn from each other. Somewhat similar to the Zone of Proximal Development that Vygotsky theorised in the early 1900’s. Hence learning become a positive experience and is more likely to be retained as theorised by Volker and later by Deci and Ryan as the in the Self-Determination Theory (SDT).

Part 2: Earlier Technology

The earlier technology of teaching was using the a course book and workbook, it gave the children a hands-on description of what has been taught and provided them with some basic tasks to consolidate their learning.

 Who was/is its intended primary audience?

The primary audience was the student and teacher, with some input from the parents with limited option to share past the classroom. Of course, there is the option to display students good works via a notice board etc but this still has limitations.

 What were/are its goals?

The main goal of this technology was to provide a means of learning the content being Biblical Studies and then passing the test and exams. In other words, we teach to the test by sticking to the curriculum.

Based on your personal experiences with it, did the technology meet its goals? Why or why not?

Although this technology did achieve the goal of passing tests and exams, it may not produce long-term learning. This can vary depend on the quality of the lesson.

Did it have other potentially unintentional effects (either positive or negative)?

Given the topic being taught it could be said that using traditional technologies to teach might reduce the students interest in the topic and hinder their future growth. With subjects such as Biblical studies student motivation is of great importance.

Part 3 – Comparative Analysis

Finally, compare and contrast your experience using the “current technology” with your experience with your “earlier technology”.

Are their approaches similar or divergent?

Both of these approaches provide a method to share information with the student, one gives then an option to read and revise, the other gives the student the option to reflect and expand beyond the realm of the textbook and then having the world as their audience rather than just the class.

How do they compare? Did you find one more engaging? More thought-provoking? More memorable? More playful or structured?  More motivating?

Having the option to presenting their ideas in a way that was meaningful to them the task then became one that left a lasting and positive experience giving them a sense of achievement which they could look back on.

Why do you think this is the case for you? Is it likely the case for other users as well?

I think that when using older technology like workbooks and textbooks, most students are already used to using technology like mobile devices, interactive TV, games and computers. Dr. Larry Rosen Did a study and found that the average Net Generation is using media up to twenty hours a day! Hence, most students would benefit with the use of Google Apps and AR.

(Image from http://drlarryrosen.com)

 What are the differences of these technologies?

 The main difference between these two tools is that textbooks only allow one media, which is written, and has a limitation on sharing and feedback, using Google Apps alongside AR provides a worldwide voice that can be changing and updating through time!

 Feel free to visit my blog https://teach2you.wordpress.com/ it show some other edtech examples I have used in the classroom.

 Thanks for taking the time to read my assignment!

 Cheers,

 Stephen Hesketh

@sdhesketh +sdhesketh